3.3 Namen & adresgegevens aanpassen
3.4 Contactgegevens toevoegen, aanpassen of verwijderen
3.6 Relaties verwijderen / samenvoegen
3.9 Groepsmailings gebaseerd op filters
3.1 Scherm layout
| Een van de belangrijkste schermen is de relatielijst, waar alle relaties in de database te vinden zijn. De relatielijst bevat, naast alle relaties en bijbehorende NAW-gegevens, alle relevante informatie van de geselecteerde relatie. | Dit is te vinden aan de rechterkant van het scherm. Iedere relatie heeft een eigen archief; hier kan u naartoe navigeren door op de naam van de relatie in de lijst te klikken. In de volgende paragrafen bespreken we alle functies die het relatielijst-scherm omvat. Eerst beginnen we met een indeling van het scherm. |
Het relatielijst-scherm in verdeeld in twee onderdelen.

1. Relatielijst
Hier zijn alle relaties in de database te vinden. Gebruik de zoekfunctie bovenaan om relaties te zoeken. Aan de rechterkant vindt u alle NAW-gegevens, labels, open taken/dossiers etc. van de geselecteerde relatie. Bij punt 2. zullen we dit verder toelichten. | De relaties staan niet in alfabetische volgorde, maar op een slimme ranking op basis van laatste interacties. U kunt de kolommen aanpassen door te gaan naar het tandwiel rechtsboven in en dan Widget aanpassen -> Beheer kolommen. |
Dubbel-klik op een naam om het archief van de betreffende relatie te openen. En gebruik de rechts-klik op een relatie om snelle acties te doen zoals de contactgegevens aan te passen, een e-mail te sturen of een taak te maken.
2. Contact-widget
Aan de rechterkant vindt u de contact-widget. Naast alle NAW- en contactgegevens ziet u in één oogopslag wat er bij deze geselecteerde relatie speelt. De rechterkant verschilt dus per geselecteerde relatie. Voeg gemakkelijk relatiegegevens toe via het '+', voeg labels toe of pas informatie (zoals info-velden en extra details) gemakkelijk aan via het Wijzig pictogram. | We noemen alle verschillende onderdelen aan de rechterkant 'widgets'. Per widget kunt u dus de informatie voor de betreffende relatie aanpassen of invullen. Wilt u de volgorde en zichtbaarheid van de gehele rechterkant, de contact-widget aanpassen? Dat kan. Klik op het tandwiel rechtsboven in en kies Widget aanpassen -> Contact widget. |
3. Headerbalk-opties
Linksboven in het scherm vindt u snelle opties zoals Voeg relatie toe om handmatig een nieuwe relatie toe te voegen en daarnaast de optie Filter relaties. Verder in dit hoofdstuk (paragraaf 3.8) bespreken we deze optie uitgebreid.
Rechtsboven ziet u het 'tandwiel'-pictogram. Hier zijn verschillende instellingen v.w.b. het relatiescherm te vinden. Het zijn allemaal persoonlijke instellingen en gelden dus alleen voor u. Een belangrijke die wij willen uitlichten is Wijzig widget. Hier kunt u o.a. de volgorde van de contact-widget aanpassen.

Sleep de onderdelen in de gewenste volgorde en vind aan/uit om wel of niet te tonen.
3.2 Relaties toevoegen
In SpinOffice kunt u relaties op verschillende manieren toevoegen (via een import, handmatig, op basis van inkomende e-mail), in verschillende hoeveelheden (meerderen of individueel) en op verschillende plekken (relatiescherm, postvak in). We zullen de verschillende mogelijkheden bespreken.
3.2.1. Bestaande relaties importeren
Importeer bestaande zakelijke en persoonlijke contacten uit verschillende bronnen. Welke bronnen zijn beschikbaar? Zie onderstaande opties.
 U vindt de importopties binnen uw Home Dashboard, dan binnen de Relaties widget het hamburger icoon, menu-optie Importeer relaties.
Dezelfde importopties zijn uiteraard ook te vinden binnen het hoofdmenu,
optie Extra -> Importeren -> Relaties.
Alle geïmporteerde relaties komen meteen netjes in uw relatielijst terecht.
Apple Contacten:
Deze optie is alleen beschikbaar voor Mac-gebruikers. Zodra u op de knop klikt, importeert SpinOffice al uw contacten inclusief hun contactgegevens. Op de mobiele iOS-app bevindt de optie zich in de rechterbovenhoek.
Office 365 Contacten:
Met een druk op de knop worden alle contactpersonen, inclusief contactgegevens, adressen en notities in SpinOffice geïmporteerd. U koppelt eenmalig uw Office 365 account met SpinOffice en SpinOffice doet de rest!
Let op, dit is een import en geen sync. Dat is ook mogelijk. Deze optie is te vinden binnen het hoofdmenu, optie Beheer -> Gebruikersinstellingen -> Synchronisatie.
.CSV of .XLS bestand:
Selecteer de optie 'CSV, XLS of .XSLX formaat' en upload uw gegevensbestand van uw lokale computer. Het enige wat u hoeft te doen is een match te maken tussen de kolommen van uw Excel-bestand en het gewenste SpinOffice veld. De applicatie helpt u per kolom in dit proces.
Bepaal ook het relatietype dat de relaties moeten krijgen. Indien dat niet wordt aangegeven dan is dat standaard 'Import'. Het is mogelijk om via een massa-aanpassing dit achteraf aan te passen indien nodig.
(Opmerking: Om het land-veld te kunnen importeren, zorg er dan voor dat de Excel kolom "Land" de twee letters ISO-landcodes bevat. Voor de volledige landenlijst: https://countrycode.org)
Mailchimp
In de Pro-versie kunt u Mailchimp verbinden door een Mailchimp API-sleutel op te geven en een mailinglijst te selecteren om te importeren.
3.2.2. Individuele relaties toevoegen
Op diverse plekken in het mogelijk om een relatie toe te voegen.
Het relatiescherm: kies Voeg relatie toe bovenaan het relatiescherm. | Uw Postvak IN: wanneer u een e-mail ontvangt van een onbekende relatie in SpinOffice, kunt u deze. | Het hoofdmenu: optie Nieuw -> Relatie. |
In alle gevallen wordt het volgende scherm getoond.

Vul de relevante informatie in en ga naar de subitems aan de linkerkant om meer informatie over de contactpersoon toe te voegen, zoals de info-velden en de gewenste labels. In het veld ‘Relatietype’ bovenaan geeft u aan welk type contact u wilt toevoegen. Bijvoorbeeld een bedrijf, leverancier, persoonlijke vriend, prospect etc. Maak uw eigen relatietypes via het hoofdmenu optie Beheer -> Relatietype. | Wanneer u een e-mailadres aan de nieuwe relatie toevoegt, gebruik dan "Koppel alle e-mailberichten aan deze relatie" als u ook alle e-mails in het archief wilt hebben. Vink het selectievakje aan en SpinOffice verzamelt alle e-mails in de database en slaat ze op in het archief van deze relatie. Standaard staat deze instelling aangevinkt. Als u alle gegevens van de contactpersoon heeft ingevuld, klikt u op Opslaan en SpinOffice zal een nieuwe relatie maken en deze aan de database toevoegen. |
Nieuwe relaties krijgen dus een eigen relatiekaart waar u alle relevante informatie kwijt kunt en daarnaast een archief waar alle communicatie terecht komt.
3.3 Namen & adresgegevens aanpassen
Overal waar de relatie staat vermeld, kunt u de gegevens van de betreffende relatie aanpassen. Er is altijd een 'humburger'-pictogram te vinden of gebruik de rechts-klik op een relatie en kies Wijzig contactgegevens. Hieronder een voorbeeld op het relatiescherm.

Vervolgens komt u in het scherm waar u alle informatie kunt aanpassen. Klik op Opslaan om de wijzigingen te verwerken.
3.4 Contactgegevens toevoegen, aanpassen of verwijderen
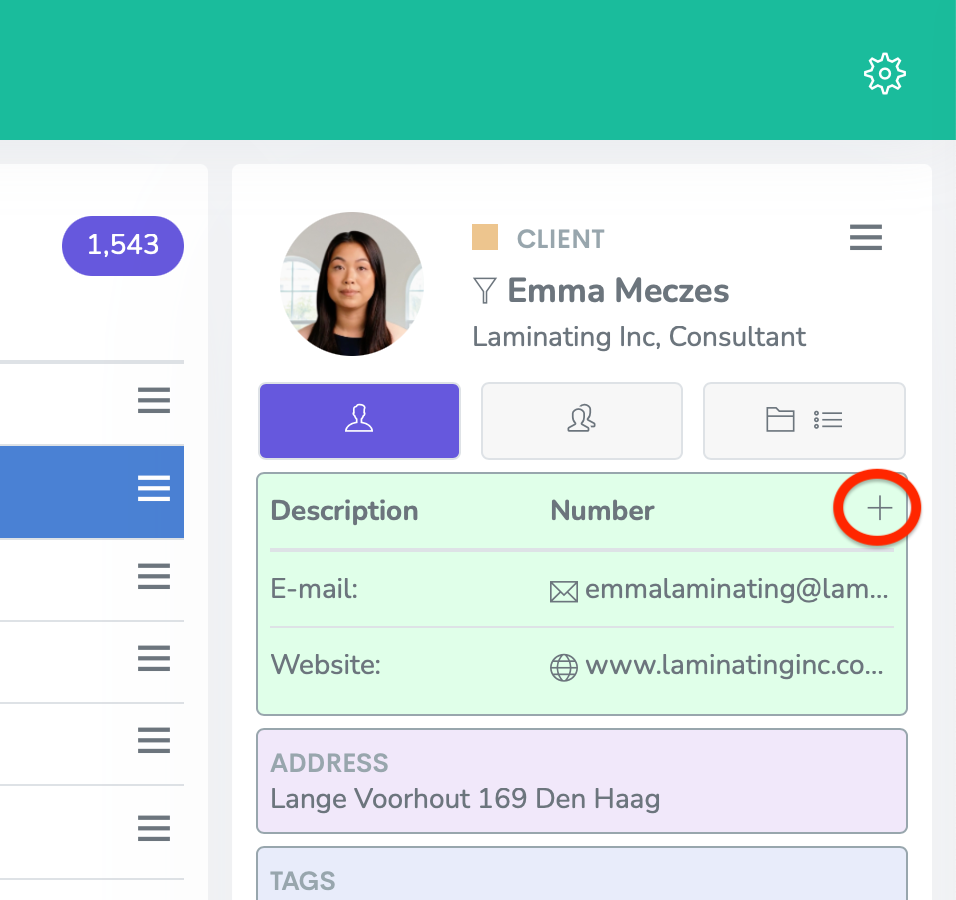
Alle contactgegevens zoals telefoonnummers, e-mailadressen, fax nummers, websites enzovoorts kunt u, net als naam-en adresgegevens via bovenstaande manier aanpassen. Maar ook binnen de contact-widget van een betreffende relatie kunt u dit gemakkelijk doen. Dat bespreken we hieronder.
Contactgegevens toevoegen
1. Klik op het '+' pictogram. |
2. Maak een keuze wat u wilt toevoegen. U kunt kiezen uit een e-mailadres, telefoonnummer (incl. fax), website URL toe of kies 'Anders' voor het toevoegen van bijvoorbeeld een Skype naam.
3. SpinOffice vraagt vervolgens om specifieke informatie te geven over de input, dat wordt genoemd als 'Beschrijving'.
4. Indien u ‘Standaard’ uitvinkt wordt de informatie opgeslagen onder ANDERE NUMMERS, en is het indien het een e-mailadres betreft niet vindbaar in de aanhef van een nieuwe e-mail.
5. Het ‘Privé’ vinkje geldt alleen indien e-mailadressen worden toegevoegd: indien ‘Privé’ is aangevinkt dan worden alle berichten van dit adres verborgen voor alle andere gebruikers.
6. Klik op Opslaan om het scherm te sluiten.
Alle invoer kan keurig synchroniseren met uw mobiele apparaten.
 | Belangrijk: Het eerste e-mailadres dat staat vermeld wordt als standaard e-mailadres gebruikt voor het versturen van individuele e-mailberichten en voor massamailings. |
Wilt u een ander e-mailadres als standaard in te stellen?
Dat kan! Gebruik dan de rechterklik op het e-mailadres dat u naar boven wilt verplaatsen en kies Verplaats naar boven.

Contactgegevens bewerken
| Contactgegevens verwijderen
|
Websites en e-mailadressen zijn aanklikbaar. Indien u dus op een e-mailadres klikt dan wordt er een nieuw tabblad geopend met uw standaard e-mailsjabloon. En een website leidt u direct naar uw web browser.
3.5 Labels
Gebruik labels om onderscheid te maken tussen relaties en deze te groeperen. Bepaal zelf welke labels u wilt gebruiken voor uw relaties. Maak bijvoorbeeld onderscheid in bepaalde producten of diensten, categorieën, een bepaalde status of klantkenmerken. Geef vervolgens iedere gewenste relatie in uw CRM de juiste label(s). Zo kunt u uw relaties nog efficiënter zoeken, categoriseren en filteren.
3.5.1 Hoe labelt u relaties?
Wanneer u een nieuwe relatie toevoegt of bewerkt in SpinOffice, vindt u de labels als tabblad aan de linkerkant van het scherm. Voeg nieuwe of vooraf gedefinieerde labels toe voor deze specifieke relatie. Het is ook mogelijk om direct vanuit het relatiescherm labels toe te voegen.
Doorloop deze stappen:
- Ga naar het relatiescherm.
- Zoek de gewenste relatie waarvoor u labels wilt toevoegen.
- U vindt de labels-widget aan de rechterkant.

- Voeg zelf de gewenste labels toe door handmatig in te voeren. Of kies uit een dropdown-lijst eerder gekozen labels.
- Alle toegevoegde labels worden direct getoond.
Doorloop uw relaties om labels toe te voegen. U heeft ongelimiteerd aantal labels tot uw beschikking.
3.5.2. Alle labels beheren
U kunt zoals gezegd zelf al uw labels bepalen en beheren. Ga naar het hoofdmenu en kies optie Beheer -> Labels. Hier kunt u ongelimiteerd aantal labels toevoegen en verwijderen. Zie hieronder een voorbeeld.

Alle labels die u handmatig hebt gebruikt voor relaties, worden ook in dit scherm getoond.
| Belangrijk: In de Pro- en Enterprise versie heeft u de beschikking over label-groepen. Dit biedt de mogelijkheid om categorieën te maken, en verschillende kleuren te gebruiken. |
3.5.3 Relaties zoeken en filteren op basis van labels
Het zoeken op labels is heel gemakkelijk.
- Begin de zoekopdracht met een hashtag ‘#’ en voer vervolgens het label in.
- Hieronder een voorbeeld waarbij we filteren op het label "hot prospect". Bij het intoetsen van #hot wordt het label getoond.
- Klik hier op en alle relaties met het label "hot prospect" worden gefilterd en getoond.

Een andere manier om relaties te filteren is door op een bestaand label bij een relatie een filter op dat betreffende label te maken.
Dat gaat als volgt:
- Ga eerst naar een relatie die het label heeft waarop u wilt filteren.
- Klik vervolgens op het ‘label’-pictogram naast de getoonde label en kies Filter toepassen.
- Alle relaties met dit label worden gefilterd en getoond.

3.5.4. Labels verwijderen
Uiteraard kan u bij een individuele relatie de label gemakkelijk weghalen door op het ‘label’-pictogram naast de getoonde label te klikken en te kiezen voor Verwijderen. Wilt u een heel label verwijderen?
Ga dan naar menu optie Beheer -> Labels en verwijder het label. Alle labels bij relaties komen dan te vervallen.
3.6 Relaties verwijderen / samenvoegen
3.6.1 Relaties verwijderen
Er zijn verschillende manieren om relaties te verwijderen: een individu in de database, alle relaties van een specifiek relatietype of een gefilterde groep relaties.
Een individuele relatie verwijderen:
- Ga naar het relatiescherm.
- Zoek de relatie die u wilt verwijderen.
- Klik er eenmalig om de relatie te selecteren.
- Gebruik de rechts-klik en kies Verwijder.
- Klik op Ok om te bevestigen.
Alle relaties van hetzelfde relatietype verwijderen:
- Ga naar het relatiescherm.
- Klik bovenin het scherm op Filter relaties. Het volgende scherm wordt getoond.

- Kies als eerste veld 'Relatietype'.
- In het tweede veld kiest u de voorwaarde, dus bijvoorbeeld "is", "is niet", "bevat" of "bevat niet".
- Vul bij 'Waarde' het relatietype waarvan u alle relaties wilt wilt verwijderen.
- Zijn alle drie de velden ingevuld? Klik dan op Filter.
- Alle relatie van het betreffende relatietype worden getoond.
- Klik nu op Massa-acties bovenin het scherm.
- Kies 'Relaties verwijderen' en bevestig.
- Alle relaties van het betreffende relatietype zijn nu verwijderd.
Let op, deze actie kan niet meer door u ongedaan worden. Neem contact met ons op wanneer er relaties moeten worden teruggezet.
Een gefilterde groep relaties verwijderen:
- Dit werkt bijna hetzelfde als hierboven vermeld staat. Maak eerst op het Relatielijst-scherm de gewenste filter van relaties die u wilt verwijderen. Bijvoorbeeld op basis van een label of relatie-veld. (Lees hier alles over filteren)
- Klik daarna op de optie Massa-acties bovenin het scherm.
- Kies Verwijder relaties en bevestig.
3.6.2 Relaties samenvoegen
- Op het relatiescherm, zoek de relatie die u in de database wilt behouden. Dat wordt de 'hoofdrelatie'.
- Gebruik de rechts-klik op de relatie in de lijst.
- Kies Voeg relatie samen. Het volgende scherm wordt getoond.

- Het eerste veld is de 'hoofdrelatie', die kunt u niet aanpassen.
- Zoek en vind de dubbele relatie in de database. Deze zal dus verdwijnen.
- Klik Voeg samen om de contactgegevens en het gehele archief bij de hoofdrelatie toe te voegen.
Komt een relatie meer dan twee keer voor in de database, dan zal u bovenstaande stappen een aantal keer moeten doorlopen tot er een relatie overblijft.
3.7 Relaties opzoeken
Gebruik het zoekveld aan de linkerkant van het scherm om een relatie te vinden. Alle zoekresultaten worden direct getoond. Alle relaties zijn op een slimme manier gerangschikt en kunnen gevonden worden op voor- of achternaam, bedrijfsnaam of e-mailadres.
3.8 Relaties filteren
Filters maken het mogelijk om een gewenst overzicht te krijgen van relaties op basis van een bepaald veld in SpinOffice. Indien u bijvoorbeeld een overzicht wilt hebben van al uw prospects of klanten die zich in hetzelfde land bevinden of na een bepaalde datum in uw database staan? Of wilt u een mailing sturen naar al uw oud-klanten, die voldoen aan een bepaald label. U kunt op ieder veld en label van een relatie filteren. Hoe u dat doet, zullen wij nu uitleggen.
Filteren kan op een aantal verschillende plekken. Hieronder ziet u de verschillende manieren.

Bovenaan het scherm: kies Filter relaties bovenin het relatiescherm en bepaal op welk veld u wilt filteren.
| Binnen de contact-widget: kies een filteroptie binnen de contact-widget aan de rechterkant:
|
In alle gevallen wordt het filterresultaat getoond op de plek waar normaal uw relaties staan. Zie hieronder. In onderstaande voorbeeld worden de 12 'hot prospects' getoond die dit labels hebben.

Binnen het filterresultaat kunt u nogmaals een of meerder filters toepassen op dezelfde manier en zo uw selectie verkleinen.
Filteren is een enorm krachtige functie binnen SpinOffice waar u veel mee kunt en die veel gebruikt wordt. Het biedt u de mogelijkheid om snel selecties te maken die u vervolgens een persoonlijke mailing kunt sturen.
3.9 Groepsmailings gebaseerd op filters
Het versturen van massa-mailing of groepsmailings is alleen beschikbaar in Pro- en Enterprise-versie.
Om een groepsmaling te maken, dient u eerst een filter te maken zoals beschreven in voorgaande paragraaf. Heeft u dat gedaan, en heeft u een filterresultaat op het relatiescherm? Dan doorloopt u de volgende stappen:
- Klik op Massa-acties bovenin het relatiescherm:

- De volgende opties worden getoond:

- Kies Verstuur groepsmailing.
- Er wordt een nieuw scherm geopend waar u een bericht kunt typen in het standaardsjabloon.

- Vul het sjabloon met content of kies onderaan een bestaand e-mailsjabloon.
- Zorg ervoor dat u een onderwerp invult. Dat is verplicht. Dit is tevens het onderwerp zoals de ontvangers dit zien.
- Bovenaan kunt u de afzender aanpassen, onderaan de optie om de mailing als privé-bericht te versturen.
- Is het sjabloon gereed voor verzenden? Klik dan op Verstuur linksboven.
- Kies voor Maak concept of Verstuur.
- Indien u kiest voor Maak concept, dan zijn deze te vinden in de Concepten-map in uw Postvak IN.
- Kies Verstuur groepsmailing.
3.10 Massa relatie-aanpassing
Indien u een relatietype voor meerdere relaties wilt aanpassen of een bepaald label wilt geven, kunt u dat snel en gemakkelijk doen.
U maakt als volgt een massa-aanpassing:
- Filter eerst de relaties die u een andere waarde wilt geven. Het filteren doet u zoals beschreven in paragraaf 3.8.
- Klik op Massa-acties bovenin het scherm.
- De volgende opties worden getoond:
- Kies Massa relatie-aanpassing. Het volgende scherm wordt getoond.

- Bepaal wat u met het gefilterde relaties wilt doen. In ons voorbeeld de 12 hot prospects. Selecteer een veld dat u wilt invullen of wijzigen voor de gefilterde groep. Klik op Aanpassen om de actie uit te voeren.
Na het doorvoeren van de gewenste massa-actie zijn de aanpassingen direct zichtbaar in uw database.
Het kunnen maken van filters en de daarbij behorende mogelijkheid tot massa-acties zijn dus een buitengewoon krachtige functie in SpinOffice.
3.11 Relatietypes
SpinOffice werkt met relatietypes. Dit is een handige manier om onderscheid te maken tussen de verschillende type relaties die u heeft zoals klanten, prospects, leveranciers, stakeholders etc.
U kunt een onbeperkt aantal relatietypes aan de database toevoegen. Ga naar menu-optie Beheer -> Relatietypes om alle relatietypes in uw database te zien. Zie hier een voorbeeld.

Klik op '+' aan de rechterkant om een nieuw relatietype toe te voegen. Er wordt onderaan een lege regel toegevoegd waar u een nieuw relatietype kunt toevoegen. Geef een naam en kies een kleur. Klik op Opslaan aan de rechterkant om het item op te slaan en het wordt toegevoegd als relatietype. Nu kunt u het voor iedere relatie in de database gebruiken.
Wilt u nu een groep relaties het nieuw toegevoegde relatietype geven? Dat kan heel gemakkelijk! Voer een massale relatie-aanpassing uit op relatie-scherm.
3.11.2 Belangrijke functies van relatietypes
Met relatietypes kunt u:
- Relaties filteren
Op het relatiescherm vindt u bovenaan de optie Relaties filteren. Gebruik dat om relaties te filteren op basis van ieder gewenst relatietype. Zo krijgt u gemakkelijk een overzicht van uw klanten, hot prospects of leveranciers. - Gebruikerstoegang beheren
Ga naar menu-optie Beheer -> Gebruikersinstellingen -> Relatieypes om te bepalen welke gebruiker toegang mag hebben tot welke relatietypes, en dus tot groepen relaties. Lees Rechten & Machtigingen. - Bepalen welke relatietypes moeten synchroniseren
Ga naar menu-optie Beheer -> Gebruikersinstellingen -> Synchronisatie om te bepalen welke relatietypes moeten synchroniseren met uw mobiele apparaten.
Bij het toevoegen van nieuwe relaties, zowel individu als door massa-import, is het relatietype een verplicht veld om in te vullen. Zoals u kunt zien, is dit een belangrijk veld in de database.
Belangrijke opmerking: een relatie in uw database kan maar één relatietype hebben.
3.12 Relaties synchroniseren
In zowel de gratis Limited als de Pro editie is het mogelijk om relaties die zich in SpinOffice bevinden te synchroniseren met uw mobiele apparaten (iOS en Android) middels een CardDAV account. Daarnaast kunt u gemakkelijk uw relatie synchroniseren met uw Office 365 contacten. Ga in SpinOffice naar menu-optie Beheer -> Gebruikersinstellingen -> Synchronisatie om dit te activeren.
Ga naar hoofdstuk 14 voor meer informatie.
Was dit artikel nuttig?
Dat is fantastisch!
Hartelijk dank voor uw beoordeling
Sorry dat we u niet konden helpen
Hartelijk dank voor uw beoordeling
Feedback verzonden
We stellen uw moeite op prijs en zullen proberen het artikel te verbeteren