3.3 Editing name & address information
3.4 Adding, editing & deleting contact details
3.6 Deleting & Merging contacts
3.9 Mass mailings based on filters
3.12 Synchronization of contacts
3.1 Screen layout
| One of the most important screens is the contact list, where all your business contacts in the database can be found. The contact list contains, in addition to all contacts and associated name and address details, all relevant information of the selected contact. | This can be found on the right side of the screen. Every contact has its archive; you can navigate to this by clicking on the contact's name in the list. In the following paragraphs, we discuss all the functions that the contact list screen includes. First, we start with a layout of the screen. |
The contact list screen is divided into two parts.

01. Contact list
All contacts in the database can be found here. Use the search function at the top to find any contact. On the right side, you will find all name and address details, tags, open tasks/folders, etc. of the selected contact. We will explain this further in point 2.
The contacts are not in alphabetical order but in a smart ranking based on last interactions. You can customize the columns by going to the cog wheel at the top right and then Customize widget -> Manage columns.
Double-click on a name to open the archive of that contact. Use the right-click on a contact to perform quick actions such as changing contact details, sending an email, or creating a task.
02. Contact widget
On the right, you will find the contact widget. In addition to all names and contact details, you can see at a glance what is going on with this selected contact. The right side therefore differs per selected contact. Easily add contact data via the '+', add tags, or adjust information (such as info fields and extra details) easily via the Edit icon.
We call all the different parts on the right side 'widgets'. You can therefore adjust or fill in the information for the relevant contacts per widget.
Do you want to adjust the order and visibility of the entire right side, the contact widget? That is possible. Click on the gear at the top right and choose Customize widget -> Contact widget.
3.2 Adding new contacts
In SpinOffice, you can add your contacts in several ways (imported or manually added) in different quantities (multiple or individual) and at different locations. SpinOffice offers the following.
3.2.1. Importing multiple existing contacts
Import your business and personal contacts from various sources into SpinOffice CRM. See the options below.

You will find the import options at your Home Dashboard, the Contacts widget hamburger icon, or via the Contacts screen, then the menu option Extra -> Import -> Contacts.
All imported contacts instantly end up neatly in your contact list.
Apple Contacts:
This option is available for Mac users only. Once you click on the button, SpinOffice imports all your contacts, including their contact details. On the mobile iOS app, the option is in the top right corner.
Office 365 Contacts:
At the touch of a button all contacts, including contact details, addresses, and notes are imported into your CRM. You connect your Office 365 account once, and SpinOffice does the rest! All your contacts from Office 365 instantly end up neatly in your contact list.
This is an import and not a sync. Although SYNC is also possible. This option can be found within the main menu, option Administration -> User settings -> Synchronization.
From .CSV or .XLS file:
Select the option ‘.CSV, XLS or XSLX format’ and upload your data file from your local computer. You only have to make a match between the data from the Excel columns and the proper field in SpinOffice. SpinOffice helps you as much as possible in this process. This way we make it a simple and convenient step.
Please define the contact type too. If not defined they will all get the contact type 'Import' in SpinOffice. It is possible to mass change this afterward in case it should be different.
Note: Use for import of the country field into SpinOffice the two-letter ISO country code in your Excel file. For a complete list of all codes: https://countrycode.org.
Mailchimp
In the Pro version, you're able to connect to Mailchimp by providing a Mailchimp API Key and picking a mailing list to import.
3.2.2. Adding a new individual contact
You can add a new contact in various spots in the application:
- The contact screen: Click Add Contact at the top of the screen.
- Your Inbox: When you receive an email from an unknown contact in SpinOffice, you can immediately add this person as a new contact to the database via the question mark icon.
- The main menu: Option New -> Contact.
In all cases, the following pop-up appears.

Fill in the relevant information and go to the sub-items on the left to add more information about the contact, such as the info fields and the tags. In the 'Contact type' field at the top, indicate which type of contact you want to add. For example, a company, supplier, personal friend, prospect, etc. | Create your contact types via the main menu option Administration -> Contact type. When you add an email address to the new contact, use "Link all emails to this contact" if you also want to have all emails in the archive. Check the box, and SpinOffice will collect all emails in the database and store them in the archive of this contact. By default, this setting is ticked. | Once you have entered all the contact details, click Save, and SpinOffice will create a new contact and add it to the database. New contacts receive their contact card, where you can store all relevant information, and also an archive where all communications end up. |
3.3 Editing name & address information
Wherever the contact is listed, you can adjust its details. There is always a 'burger' icon, or use the right-click on a contact and choose Edit contact details. Below is an example of the contact screen.

You will then arrive at the screen where you can adjust all the information. Click Save to process the changes.
3.4 Adding, editing & deleting contact details
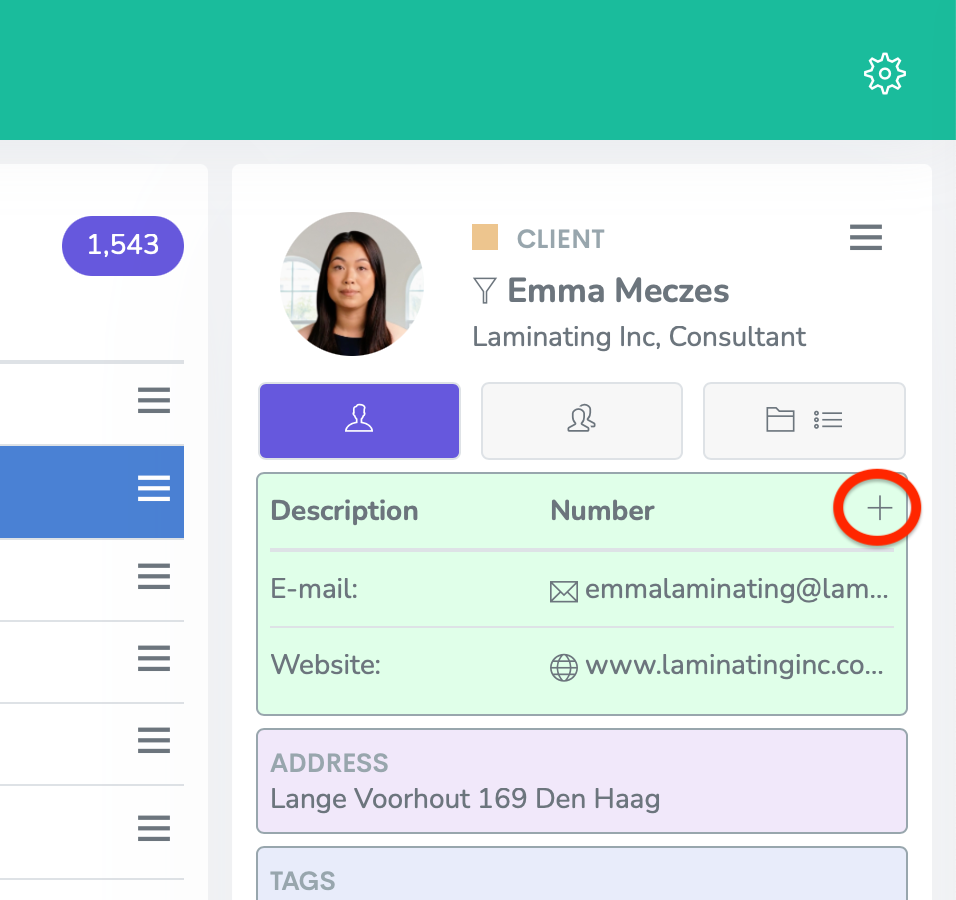
| You can change all contact details, such as telephone numbers, e-mail addresses, fax numbers, websites, as well as name and address details, via the above method. | But you can also easily do this within the contact widget of a relevant contact in your database. We will discuss that below. |
Add contact information
1. Click the '+' icon.
2. Select what to add: email, phone number (including fax), website URL, or "Other" (e.g., Skype name).
3. Provide a description when prompted.
4. Uncheck "Standard" to save the info under OTHER NUMBERS, or prevent an email from appearing in new email headers.
5. For email addresses, checking "Private" hides messages from other users.
6. Click Save.
All inputs sync seamlessly with mobile devices.
 | Important: The first email address mentioned will be the default address used for sending individual emails and for mass emails. |
To move another email address as default, just right-click on the email address you want to move to the top and select Put on top. See the example below.

Edit Contact Details
- Right-click the item, select "Edit," update the info, and click "Save."
Delete Contact Details
- Right-click the item, select "Delete," and confirm.
- To remove linked messages, check "Disconnect this email address from this contact." Otherwise, messages remain saved.
- Click "Ok."
Websites and email addresses are clickable. Clicking an email opens a new message, and clicking a website opens it in your browser.
3.5 Tags
Use tags to organize your business contacts. Choose tags based on products, services, categories, status, or customer traits. Assign the appropriate tags in your CRM to easily search, categorize, and filter contacts.
3.5.1 How do you tag your contacts?
In SpinOffice, you can add or edit tags for a contact via the Tags tab on the left of the Add Contact screen. Tags can also be added directly from the Contact screen. To do that, go through these steps:
- Go to the Contact screen.
- Find the desired contact for which you want to add tags.
- You will find the tags widget on the right.
- Add tags as you want by entering them manually. Or choose previously selected tags from a drop-down list.
- All added tags are immediately shown.

Go through your contacts to add your tags. You have an unlimited number of tags at your disposal.
3.5.2 Manage all tags
You can manage your tags in the main menu under Administration -> Tags. Add or remove unlimited tags as needed. See the example below.

All tags that you have manually used for contacts are also shown on this screen.
| Important: In the Pro and Enterprise versions, you have access to tag groups. This offers the possibility to create categories and use different colors. |
3.5.3 Search and filter contacts based on tags
Searching by tags is very easy.
- Start the search with the hashtag "#" and then enter the tag.
- Below is an example where we filter on the tag "hot prospect". Pressing #hot will show the tag.
- Click on the tag in the search list, and all contacts with the tag "hot prospect" will be filtered and displayed.

Another way to make a filter of your contacts based on a filter is to create a filter on an existing tag for a contact.
- First, go to a contact that has the tag you want to filter on.
- Then click on the 'tag' icon next to the tag shown and choose Filter.
- All contact with this tag is filtered and shown.

3.5.4. Removing tags
Of course, you can easily remove the tags from an individual contact by clicking on the 'tag' icon next to the displayed tag and choosing Delete. Do you want to delete an entire tag? Then go to the menu option Administration -> Tags and remove the tag itself. The tag will be removed for all contacts.
3.6 Deleting & Merging contacts
3.6.1 Deleting contacts
There are various options to delete contacts: an individual in the database, all contacts of a certain contact type, or a filtered group of contacts.
To delete an individual contact:
- Go to the contact screen.
- Find the contact you want to delete.
- Click once to select the contact.
- Use the right-click and choose Delete.
- Click Ok to confirm.
To delete all contacts of the same contact type:

- Go to the Contact screen.
- Click on Filter contacts at the top of the screen. The following screen is displayed.
- Select 'Contact type' as the first field.
- In the second field, you choose the condition, for example "is", "is not", "contains" or "does not contain".
- Under 'Value', enter the contact type for which you want to delete all contacts.
- Are all three fields filled in? Then click on Filter.
- All contacts are shown.
- Now, click on Mass Actions at the top of the screen.
- Choose Delete contacts and confirm.
- All contacts of the relevant contact type have now been deleted.
Please note that you cannot undo this action. Please contact us if any contacts need to be restored.
To delete a filtered group of contacts:
- Filter all contacts that should be deleted (see Chapter 3.8 How to do that).
- Click on Mass Actions at the top of the screen.
- Choose Delete contacts and confirm.
3.6.2 Merging contacts
- On the Contact screen, find the contact you want to keep in the database. That will be the 'main contact'.
- Use the right-click on a contact in the list.
- Choose Merge contacts. The following screen is displayed.
- The first field is the 'main contact', which you cannot edit.
- Search and find the duplicate contact in the database. So this will disappear.
- Click Merge to add the contact details and the entire archive to the main contact.
If a contact appears more than twice in the database, you will have to go through the above steps many times until only one contact remains.

3.7 Searching contacts
Use the search field on the left side of the screen to find any contact. All search results are displayed immediately. All your contacts are arranged smartly and can be found by first or last name, company name, or email address.
3.8 Filtering contacts
Filters allow you to obtain an overview of contacts that meet certain search criteria. For example, would you like to have an overview of all your prospects, or of all customers that are located in the same country? Or do you want to send a mailing to all your former customers? You can filter on almost every field, and you can also filter on filter. How do you do that? We will show you.
Filtering can be done in many different places. Below you can see the different ways.

At the top of the screen: choose Filter contacts at the top of the screen and determine which field you want to filter on.
| Within the contact widget: choose a filter option within the contact widget on the right:
|
In all cases, the filter result is shown where your contacts are normally located. See below. The example below shows the 12 'hot prospects' that have these tags.

Within the filter result, you can apply one or more filters again in the same way and thus reduce your selection.
Filtering is an extremely powerful function within SpinOffice that you can do a lot with, and that is widely used. It offers you the opportunity to quickly make selections that you can then send a personal mailing.
3.9 Mass mailings based on filters
To create a group grind, you must first create a filter as described in the previous section. After that, go through the following steps:
- Click on Mass actions on top:

- The following options are shown:

- Choose the Send group mailing.
- A new screen will open where you can type a message in the default template.

- Fill the template with content or choose an existing email template at the bottom.
- Make sure you enter a subject. That is mandatory. This is also the subject as the recipients see it.
At the top, you can adjust the sender, and at the bottom, the option to send the mailing as a private message.
Is the template ready to send? Then click Send at the top left.
Choose Create concept or Send.
If you choose Create a Concept, these can be found in the Concepts folder in your inbox.
3.10 Bulk contact change
If you want to customize a contact type for multiple contacts or give it a specific tag, you can do so quickly and easily.
To create a bulk contact change:
- First, filter the contacts that you want to give a different value. Filter as described in section 3.8.
- Click on Mass Actions at the top of the screen.
- The following options are shown.
- Choose Bulk contact change. The following screen is displayed.

- Decide what you want to do with the filtered contacts. In our example, the 12 hot prospects. Select a field to fill or change for the filtered group. Click Change to act.
After implementing the desired mass action, the adjustments are immediately visible in your database.
Being able to create filters and the associated possibility of mass actions is therefore an extremely powerful function in SpinOffice.
3.11 Contact types
SpinOffice works with contact types. This is a useful way to distinguish between the different types of relationships you have, such as customers, prospects, suppliers, stakeholders, etc.
| You can add an unlimited number of contact types to the database. Go to the menu option Administration -> Contact types to see all contact types in your database. See the example below. | Click '+' on the right to add a new contact type. An empty line will be added at the bottom where you can add a new contact type. Give a name and choose a color. Click Save on the right to save the item, and it will be added as a contact type. Now you can use it for every contact in the database. |

Do you now want to give a group of contacts the newly added contact type? That can be done very easily! Do a bulk contact change.
3.12 Synchronization of contacts
| In both the free Limited and Pro editions it is possible to synchronize contacts located in SpinOffice with your mobile devices (iOS and Android) using a CardDAV account. | In addition, you can easily synchronize your contacts with your Office 365 contacts. In SpinOffice, go to the menu option Administration -> User settings -> Synchronization to activate this. |
Please go to Chapter 14 to read how to activate the sync.
Was this article helpful?
That’s Great!
Thank you for your feedback
Sorry! We couldn't be helpful
Thank you for your feedback
Feedback sent
We appreciate your effort and will try to fix the article