The calendar in SpinOffice can sync with your Mac Calendar, iOS, or Android device. To have it up and running, you first have to activate the sync in SpinOffice. After that, you can configure the details of the so-called CalDAV account on your Mac to have your SpinOffice calendar in sync.
1. Activate the Calendar sync in SpinOffice
- Go to the Contacts screen to the menu option Administration -> User settings -> Synchronization.
- Click on 'Synchronize my calendar' and choose 'Save'.
- A CalDAV account is created. You will receive a confirmation by email with a link to the manuals on how to set up the sync on all your devices.
2. Configure the CalDAV account on your Mac
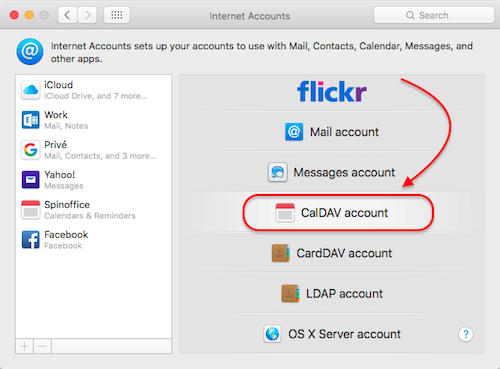
- On your Mac, go to Launchpad and open System Preferences -> Internet Accounts.
- In the right frame, click on Add Other Account.
- Choose the type of CalDAV account.

- Select the account type: Manual.
- Fill in the following information:
- User name: [enter the email address where you received the activation email]
- Password: [your SpinOffice login password]
- Server: https://sync.spinoffice-crm.com
- Click on Sign in in the bottom right corner, and the account will be verified.
- The sync account is now added as an Internet Account.
- Give your description of this account, for example, ‘Business calendar’.
- The reminders option does not need to be ticked.
- Open the Calendar on your Mac to display your SpinOffice appointments.
It may take a few minutes to get all items in the calendar, so please do not adjust settings too fast!
All changes made here will sync on every device where this CalDAV sync account has been configured.
Was this article helpful?
That’s Great!
Thank you for your feedback
Sorry! We couldn't be helpful
Thank you for your feedback
Feedback sent
We appreciate your effort and will try to fix the article